I am posting this article to show how WiNG based controller and Wireless AP can inter operate with ExtremeNetworks NAC solution. NAC solution is from Legacy Enterasys before ExtremeNetworks acquired Enterasys, and WiNG is from Zebra ( legacy Motorola solution ) before ExtremeNetworks acquired part of Zebra. Backend system such as NAC, netsight, Purview are well developed system which is good for controlling access and and managing networking devices, so WiNG wireless solution need to be integrate with backend system such as Netsigth and NAC. Because NAC systems are working based on Radius, there are no problem to inter operate, but let me show you how to configure WiNG system to take advantage of NAC solution for authentication and access control on the WLAN.
Authentication using EAS
Authentication using EAS
The figure below shows the components in use and how authentication flows through the solution.
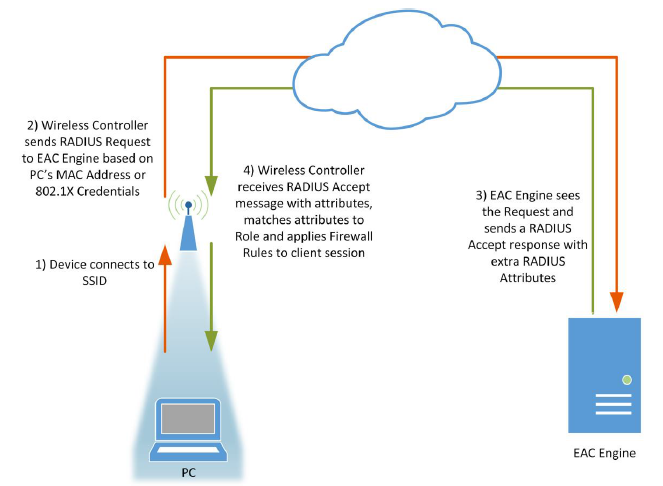
1. As the device connects to the wireless SSID, either MAC-based authentication or 802.1X authentication will occur.
2. The wireless controller will send a RADIUS request destined to the Access Control Engine for authentication.
3. The Access Control Engine will authenticate the RADIUS request per its configuration. It will pass back RADIUS attributes that the wireless controller can interpret.
4. The wireless controller will match the attributes to a Wireless Client Role and enforce the corresponding Firewall rules or application policies.
Configuring the Wireless Controller to Authenticate to Access Control
The configuration of the ExtremeWireless WiNG controller to authenticate to Access Control consists of five parts.
1. Configure SNMP to manage the wireless controller.
2. Configure the RADIUS settings to authenticate against the Access Control Engine.
3. Configure the Wireless Client Roles that will be assigned from Access Control.
4. Configure the Captive Portal on the wireless controller.
5. Configure the SSID for authentication against Access Control.
Step 1 – Configure SNMP
In order for ExtremeManagement to manage a wireless controller, SNMP needs to be configured. Ideally SNMPv3 is used due to its security and efficiency compared to SNMPv1 or SNMPv2.
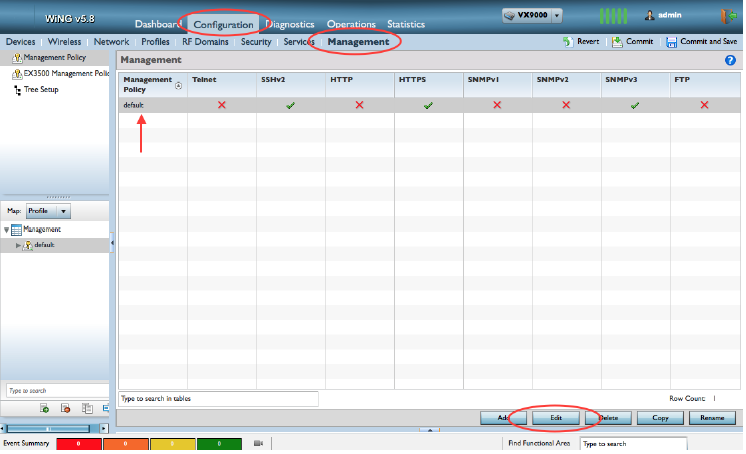
SNMP configuration is accomplished by logging into the wireless controller and navigating to Management tab under Configuration. In the Management Policy section select the the management policy in use and select Edit:
In the management policy, select the SNMP tab. Ensure that SNMPv3 is enabled. Then select the SNMPv3 Users and verify the settings so that they can be used when configuring Access Control. If desired, change the password from the default, Once complete, if any changes were made, select OK followed by a Commit.

Step 2 – Configure RADIUS
In order for the wireless controller to authenticate against Access Control, the Access Control Engine needs to be configured as a RADIUS server in the wireless controller with some specific settings enabled. To accomplish this, navigate to the Network tab under Configuration. Then select the AAA Policy section. Select the Add button to create a new AAA policy. Name the new policy and select Continue.
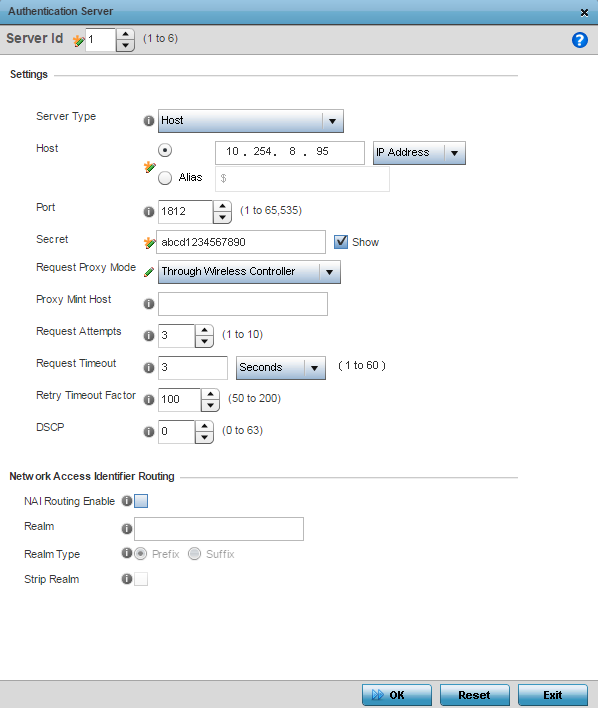
In the Authentication Server window, use the following settings in addition to the defaults that are populated. Select OK and then Exit when the settings are complete.
Select the RADIUS Accounting tab and add a RADIUS Accounting Server. Use the default settings with the exception for the Host IP, Secret, and Request Proxy Mode as with the Authentication Server. Select OK and Exit when the settings are complete.
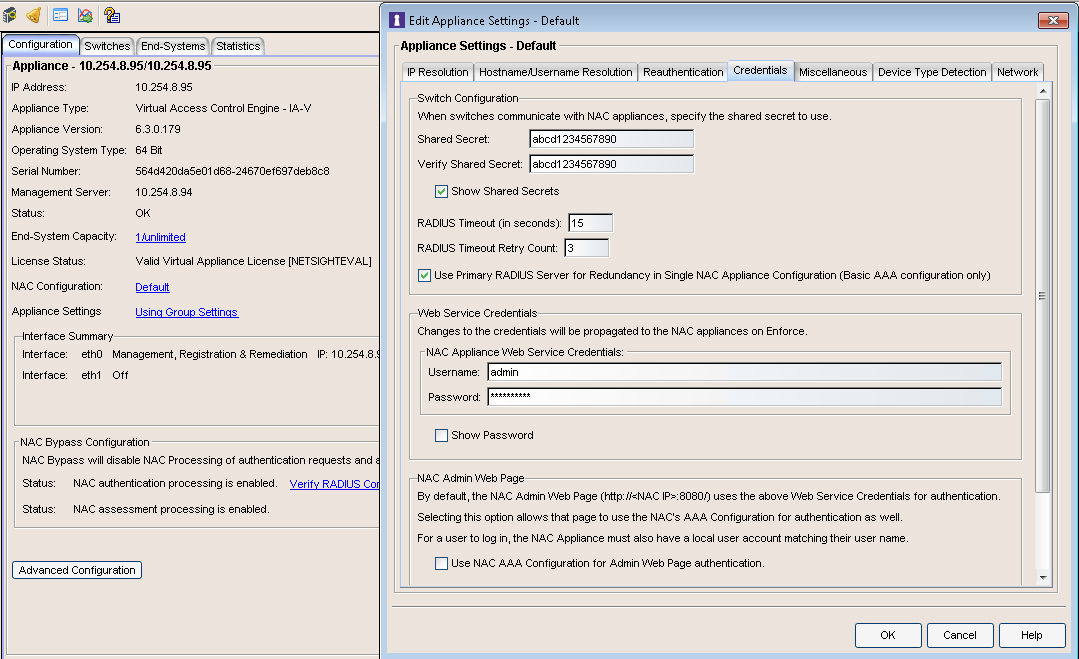
Same shared secret must be configured on NAC.
Finally, select the Settings tab of the AAA policy. In this screen, a few items need to be adjusted. Once completed, select the OK button followed by Exit and then Commit.
In the RADIUS Accounting section, change the Accounting Packet Type to Start/Interim/Stop.
In the RADIUS Address Format section, change Attributes to All.
In the Access Request Attributes section, enable the Cisco VSA Audit Session Id option and the Add Framed IP Address option.
Once completed, select the OK button followed by Exit and then Commit.

Step 3 – Configure Roles and Firewall Rules
Differing levels of access to users and devices can be assigned based on a rules engine running on Access Control. These levels of access are defined by Wireless Client Roles in the wireless controller. The Roles allow for a mapping of a VLAN ID, Application Policies, IPv6 Firewall Rules, IPv4 Firewall Rules, and MAC-Based Firewall Rules. For the purposes of this document, Application Policies and IPv4 Firewall rules will be shown.
Application Policies
An application policy can be created to control layer 7 applications such as streaming video applications, social media, and peer to peer applications. To create such policies, navigate to the Network tab under Configuration. Then select the Application Policy section. Select the Add button to create a new Application Policy.

Name the new application policy and create the types of Application Policy Rules that are desired. Each Application Policy Rule can be added by creating new rows. Once the rules are created, select OK and Exit. Commit the changes when complete.

IPv4 Firewall Policies
To create the desired IPv4 Firewall rules, navigate to the Security tab under Configuration. Then select expand the IP Firewall tree and select the IPv4 ACL section. In this section, IP Firewall Policies can be created for use in the Wireless Client Roles. To create a new policy, select the Add button.
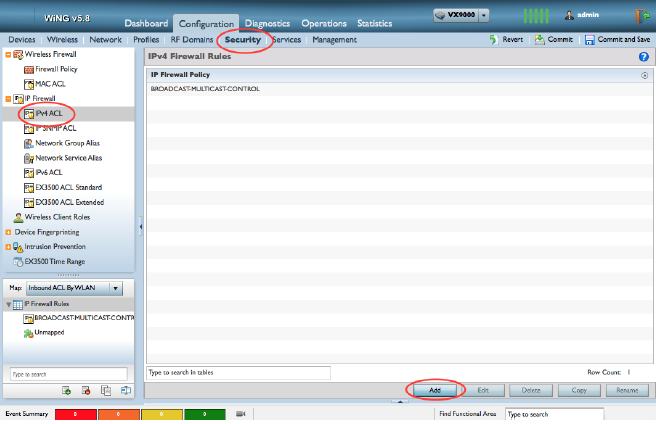
In the new IP Firewall Policy, assign a name that can be used for the Wireless Client Role. Create individual ACL rules that will be assigned to match the desired level of access. The rules can be re-ordered with drag-and-drop if desired. Once complete, select the OK button followed by Exit. Then select the Commit button.

Wireless Client Role
To create the role that will be assigned by Access Control, navigate to the Security tab under Configuration. Then select the Wireless Client Roles section. In this section, role policies can be created. In most networks, only one policy will be created with multiple roles within the policy. To create a new policy, select the Add button.
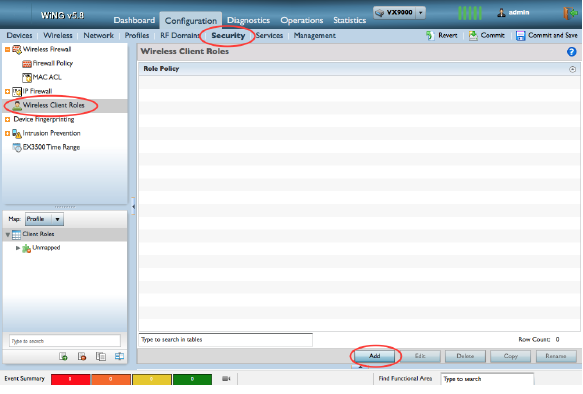
Name the role policy, then press OK. Next, select the Roles tab to start creating the roles.

In the new Role, enter a name and select OK. In the Match Expressions field, change the Group Configuration to create an Exact match of the name of the Filter-Id that will be received from Access Control. For instance, if the Guest Access role is being sent back, the matching configuration should match the screenshot below. Also note that for different roles, the Role Precedence needs to be different. Once that is set, select the Firewall Rules tab to assign the access.

In the Firewall Rules tab, the previously created Application Policy and IP ACL rules can be be assigned as well as a VLAN override if desired. Once the firewall rules are complete, select the OK button followed by Exit.

Repeat this process for any additional roles that need to be created. Commit the changes once complete.

Assign the Roles Profiles
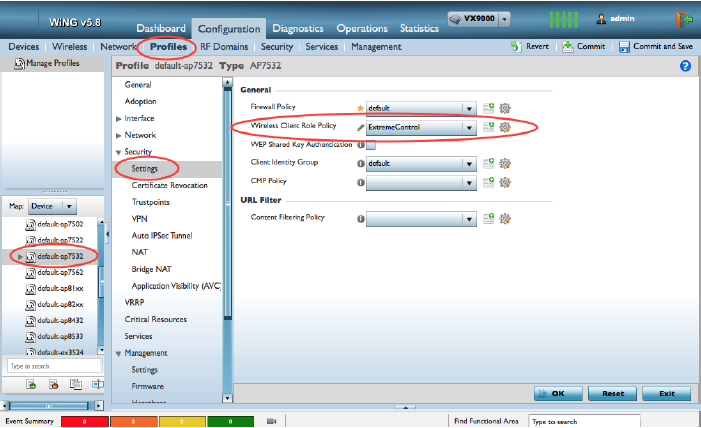
The last step to enable the Roles is to assign it to a Device or Profile. If Application Policies are also being used the DPI engine needs to be enabled. Accomplish this by navigating to the Profiles tab under Configuration. Select the Profile that needs to be modified and expand the Security section of the profile. In the Settings section, select the Wireless Client Role that was created from the dropdown list. Select OK to save the setting then select the Application Visibility (AVC) section.
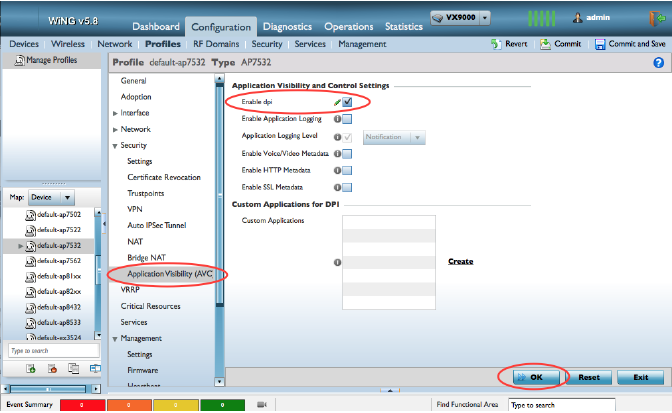
In the Application Visibilty (AVC) section, enable the checkbox for Enable dpi and select OK followed by Exit and
Step 4 – Captive Portal Configuration
Extreme Wireless WiNG can use a centralized external captive portal for authentication and registration. The captive portal configuration also needs to include a DNS whitelist of websites that a client is allowed to go to while still in the captive state. The captive portal URL is dynamically assigned from Access Control via a RADIUS attribute when a client needs to be redirected.
To create the captive portal configuration, select the Services section of Configuration. Then select the Captive Portals section. Select Add to create a new configuration.

In the new Captive Portal policy, select Centralized Controller for the Captive Portal Server Mode. In the Captive Portal Server Host field, specify a non-existing server host where the web request would typically be sent. In the Access field, select No authentication required for the Access Type. Press OK to save the new Policy.

While still in the newly created Captive Portal Policy, scroll down to DNS Whitelist and select the Add button.

Create entries in the DNS whitelist for both the IP address and hostname of the Access Control Engines used on the network. Once added, select the OK and Exit buttons.

In the Captive Portal Policy, select the newly created DNS Whitelist from the dropdown menu and then select OK followed by Commit.

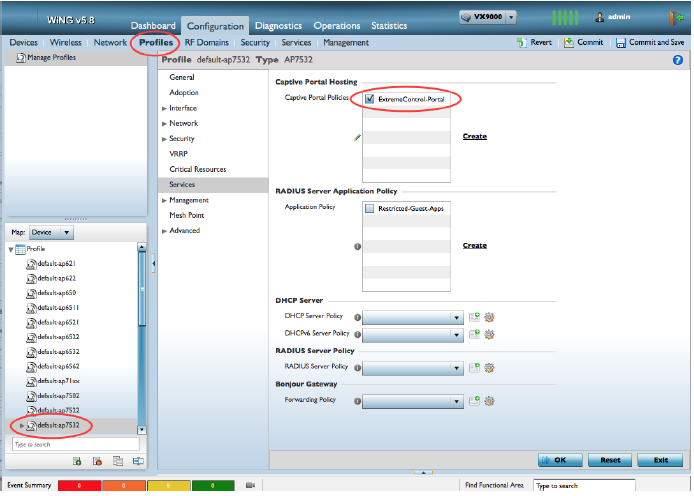
The final step is to assign the new Captive Portal policy to the Device Profiles in use. To do this, select the Profiles tab under Configuration and then navigate to the profile to be modified. Select the Services tab of the profile and then select the checkbox next to the new Captive Portal Policy. Once complete, select the OK button followed by Commit.
Step 5 – Create the Wireless Networks
The last part of the configuration of the wireless controller is the mapping of all of the settings to a wireless network. Navigate to the Wireless tab of Configuration and select the Wireless LANs section. Select the Add button to create a new wireless network.

In the new WLAN screen, create the basic configurations required such as the SSID name, Bridging Mode and VLAN Assignment. Then enable the Allow RADIUS Override checkbox and select the OK button.

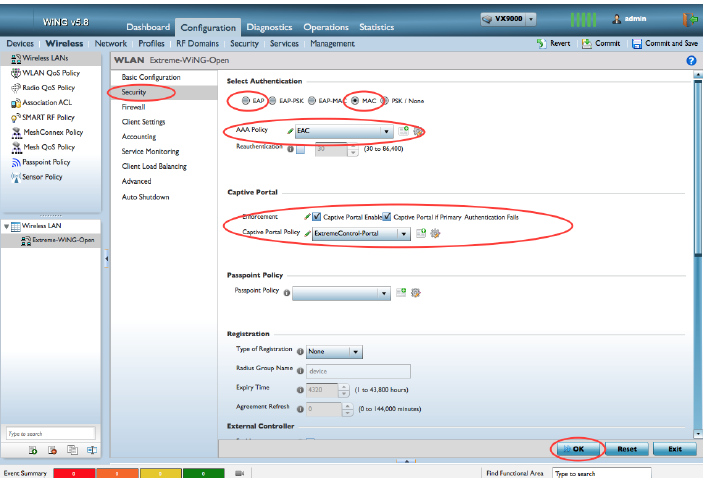
Next, navigate to the Security section of the WLAN. If using 802.1X select EAP. Otherwise, select MAC for the authentication type. Once the authentication type is set, select the AAA Policy that was created from the drop down list. Next, select the checkboxes next to Captive Portal Enable and Captive Portal if Primary Authentication Fails. From the Captive Portal Policy drop down list select the previously created Captive Portal Policy. If the encryption methods need to be set for the SSID type, scroll further down the page and select the appropriate settings for the type of SSID. Select the OK button to continue.
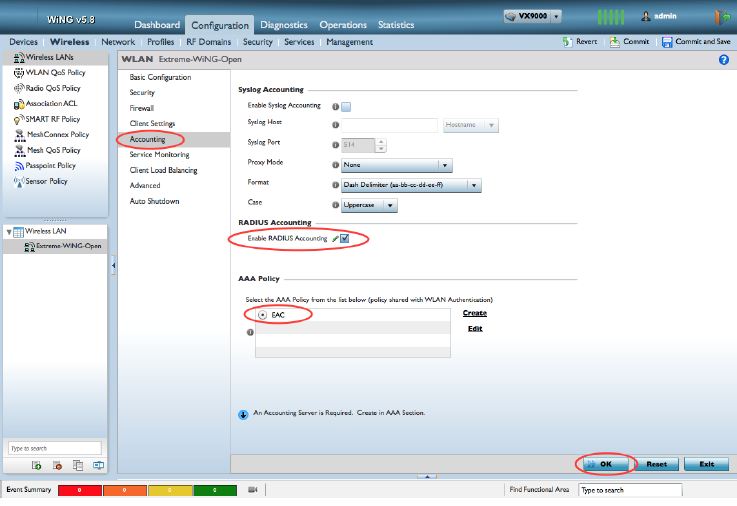
Next, select the Accounting section of the WLAN. Select the checkbox for Enable RADIUS Accounting and ensure that the AAA Policy previously created is selected. Select the OK button to continue.
The last configuration step for the WLAN is in the Advanced section. Select the checkbox next to RADIUS Dynamic Authorization and then select OK followed by Exit. Then Commit the configuration.

The last configuration step for the Wireless Network is to assign it to the AP Radios. Navigate to the appropriate Profile and expand the Interface section to select the Radio. Select a radio and then the Edit button.
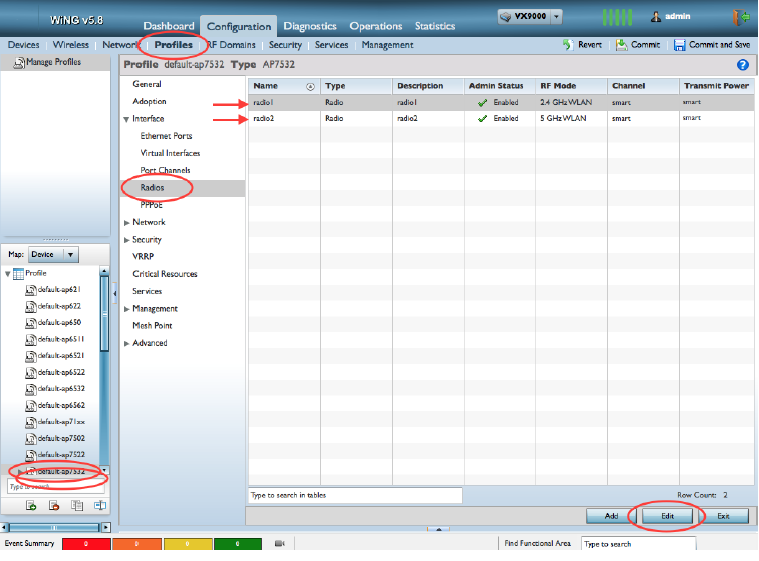
In the Radios window, select the WLAN Mapping / Mesh Mapping tab. Select the newly created WLAN and then the arrow to map it to the radio. Select the OK button followed by Exit and repeat the process for any additional radios.

Great information. Also look into our top notch services and solution on IT infrastructure services in chennai . Experts in Annual Maintenance Contract (AMC) services in chennai, Cloud Management Services in chennai, Cyber Security Consulting Services in chennai, Access Points & Controllers in chennai, NAC Implementation and Solutions in chennai
ReplyDelete